This post may contain affiliate links. When you purchase through links on my site, I may earn a commission at no cost to you. See my Privacy Policy for details.
Keeping your garden thriving often comes with its challenges, and garden pests are a common frustration for many gardeners. These uninvited guests can wreak havoc on your plants, stunting growth and reducing harvests. From tiny aphids to stubborn hornworms, knowing how to spot and manage these pests is key to maintaining a healthy and productive garden. I’ll walk you through ten of the most common garden pests and share practical tips for controlling them. For instance, strategies like companion planting can be a game-changer for natural pest control. Let’s ensure your garden remains as bountiful and pest-free as possible!
1. Tomato Hornworm
Tomato Hornworms are one of those pests that make gardeners cringe. These large, green caterpillars seem to appear out of nowhere, and their appetite can be absolutely devastating to tomato plants. If you’ve ever woken up to find once-thriving plants reduced to chewed-up stems, you’re likely dealing with these pests. Let’s break down what you need to know about them.
What Damage Do Tomato Hornworms Cause?
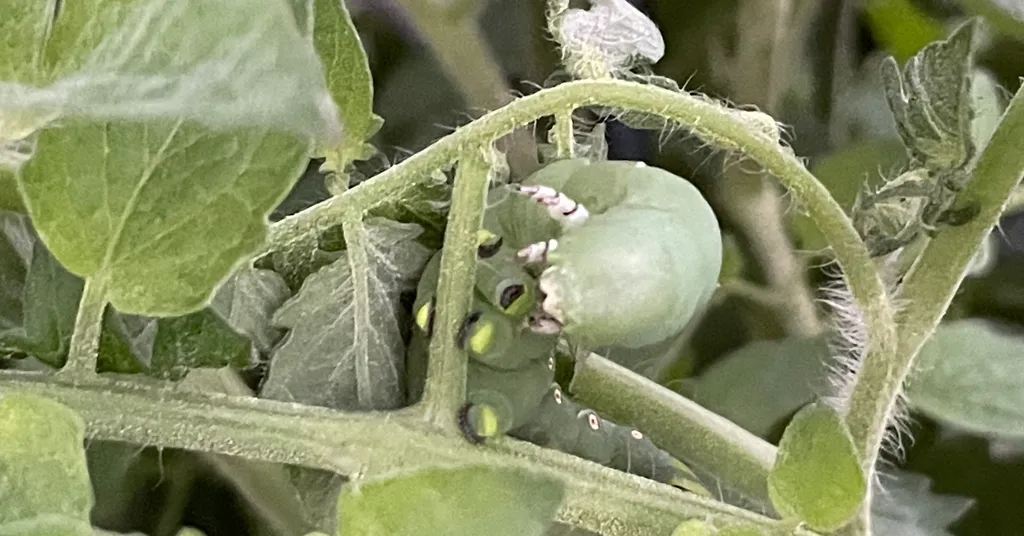
Tomato Hornworms are notorious for their destructive feeding habits. They target tomato plants, but they can also cause damage to peppers, eggplants, and potatoes. These pests chew through leaves, leaving behind skeletonized foliage. In severe cases, they can strip an entire plant bare. If you notice large, irregular holes and bare stems, it’s a tell-tale sign they’ve been at work. They often munch on green fruits as well, leaving unsightly scars and ruining your harvest.
Perhaps the most frustrating part? They seem to blend in perfectly with the plants, making them hard to spot at first glance.
How to Identify Tomato Hornworms
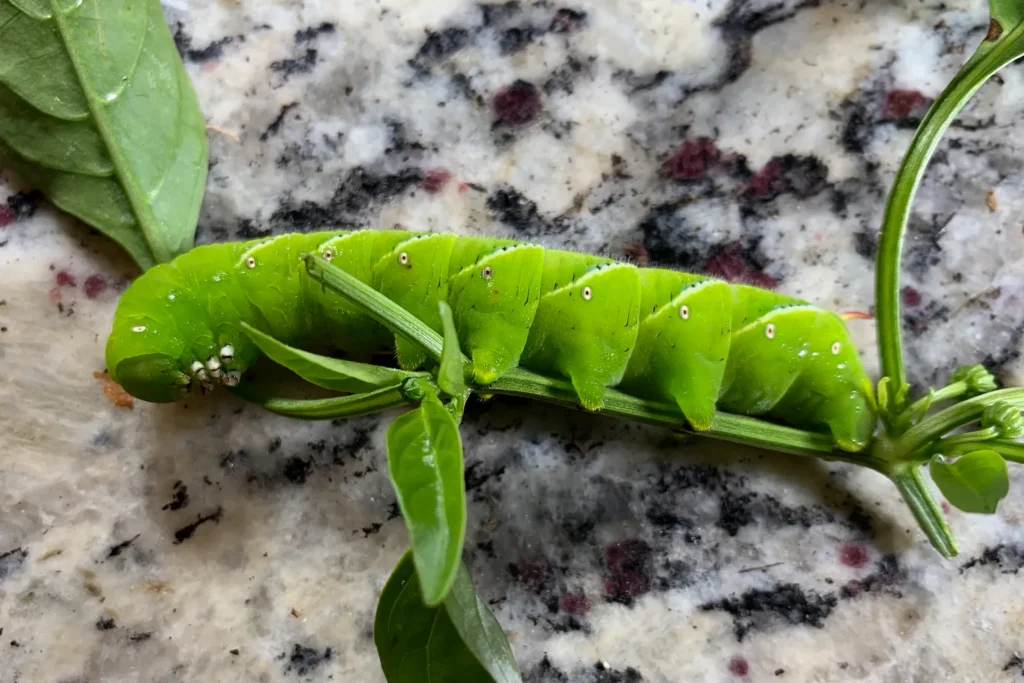
Spotting these pests is critical for controlling their population. Tomato Hornworms are bright green caterpillars with white diagonal stripes along their sides and a distinctive horn-like projection at their rear. They can grow up to 4 inches long, making them one of the largest caterpillars in the garden.
Look beneath leaves and along stems where they love to hide. You might also notice their dark green droppings, known as frass, scattered on the ground or on leaves—another clue that they’re nearby.
Natural Methods to Control Tomato Hornworms
Dealing with Tomato Hornworms doesn’t have to mean resorting to harsh chemicals. Here are some natural and effective ways to control them:
- Hand-Picking: While it may not be the most glamorous method, physically removing hornworms is one of the most effective ways to stop them in their tracks. Wearing gloves, remove them from plants and drop them into a bucket of soapy water. Hornworms will glow under blacklight. I like hand-picking at night while using a blacklight. You can find them much easier this way.
- Utilize Beneficial Insects: Parasitic wasps are natural enemies of Tomato Hornworms. These wasps lay their eggs on the caterpillars, effectively halting their destruction. You can encourage these “garden helpers” by planting nectar-rich flowers.
- Companion Planting: Certain plants like borage and marigolds can naturally repel Tomato Hornworms. Consider incorporating these into your garden to provide a natural line of defense. Learn more about the advantages of companion planting through 9 Companion Plants for Tomatoes.
- Bacillus thuringiensis (Bt): This naturally occurring bacteria targets caterpillars specifically, making it an organic option for dealing with infestations. Apply it carefully, making sure to target the undersides of the leaves.
- Keep an Eye Out: Regularly inspect your tomato plants throughout the growing season. The earlier you spot an infestation, the easier it is to stop them before too much damage is done.
To dive deeper into eco-friendly approaches, check out 5 Ways to Naturally Control Tomato Hornworms in Your Garden. It has even more tips to keep these pests off your plants.
By keeping a close eye on your plants and using natural control strategies, you can tackle Tomato Hornworms effectively and keep your tomato plants healthy.
2. Imported Cabbageworm
The Imported Cabbageworm, scientifically named Pieris rapae, is one of the most common garden pests that targets brassica crops like cabbage, broccoli, and kale. As their name suggests, they have a particular fondness for leafy greens. If you’ve noticed your plants riddled with irregular holes or covered in green excrement, you might be dealing with these voracious feeders. Here’s what you need to know to identify and manage these pests effectively.
What Damage Do Imported Cabbageworms Cause?
Imported Cabbageworms are incredibly destructive to brassica plants. Their larvae feed on leaves, leaving large, uneven holes that can significantly impact the health and appearance of your crops. Beyond the visible damage, they often leave behind greenish-brown fecal pellets, which can make harvested produce unsightly and reduce its marketability or appeal for home use.
If left unchecked, these caterpillars can completely devour seedlings or bore into mature plants, particularly cabbage heads. This not only leads to stunted growth but can also ruin the harvest altogether.
How to Identify Imported Cabbageworms
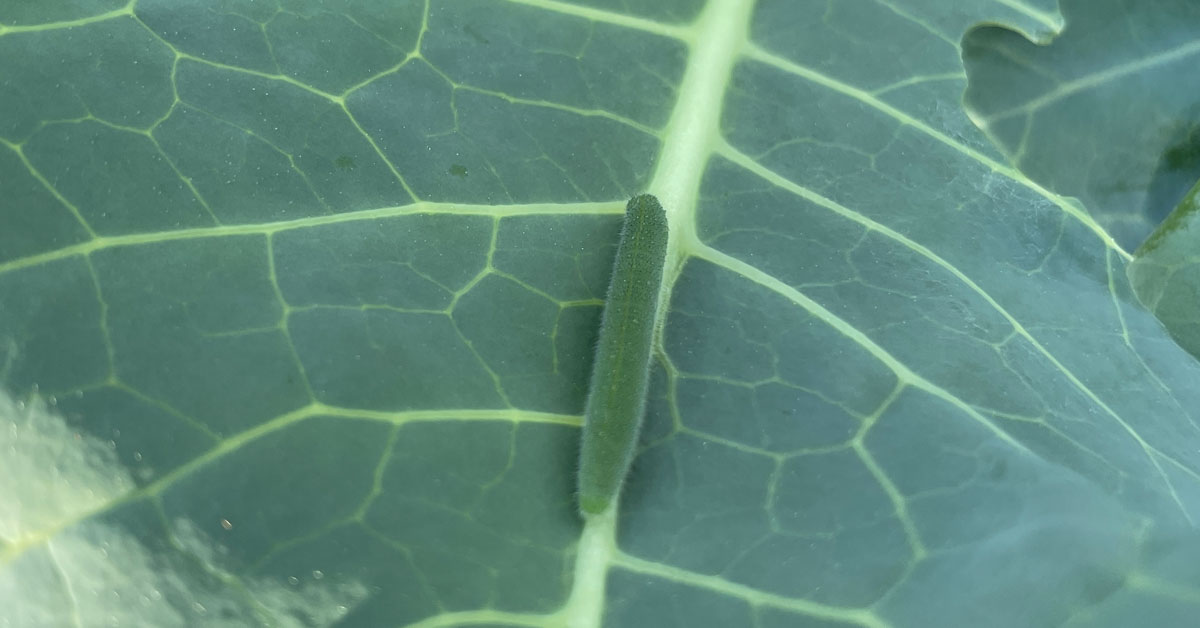
Adult cabbageworms are actually the white butterflies you might see fluttering around your garden. They may look harmless, but this is the stage where they lay eggs. The caterpillars, which cause the damage, are velvety green with faint yellow stripes running down their body. They can grow up to an inch long and often hide on the undersides of leaves.
You might also notice their eggs, which are tiny, pale yellow, and oval-shaped, clustered on the leaves. Regular scouting for these signs can be your first step in catching an infestation early.
How to Control Imported Cabbageworms
Luckily, there are several ways to manage these garden pests without resorting to synthetic pesticides. Here are some tried-and-true methods you can rely on:
- Physical Barriers: Use floating row covers to prevent butterflies from laying eggs on your plants. Be sure to secure the edges firmly to the ground so pests cannot crawl underneath.
- Hand Removal: Similar to Tomato Hornworm control, picking caterpillars off plants manually can be effective. Just drop the caterpillars into a container of soapy water to dispose of them.
- Encourage Predators: Natural predators like wasps (Cotesia rubecula) and birds can help control Imported Cabbageworm populations. You can attract these beneficial insects by planting nectar-rich flowers like dill, fennel, and yarrow nearby.
- Bacillus thuringiensis (Bt): This naturally occurring bacteria is safe for humans and pets but highly effective against caterpillars. Apply it in the early stages of infestation, targeting the leaves where the larvae are feeding.
- Regular Monitoring: The earlier you catch these pests, the easier they are to control. Check your plants frequently, focusing on the undersides of leaves and other hidden spots.
For more details on managing these pests, you can visit Control and Prevent Imported Cabbageworms. This guide offers additional insights into prevention techniques and organic solutions.
By taking a proactive approach and incorporating these methods into your gardening routine, you can keep Imported Cabbageworms from ruining your brassica crops. A healthy garden is all about staying vigilant and using natural defenses to your advantage.
3. Aphids
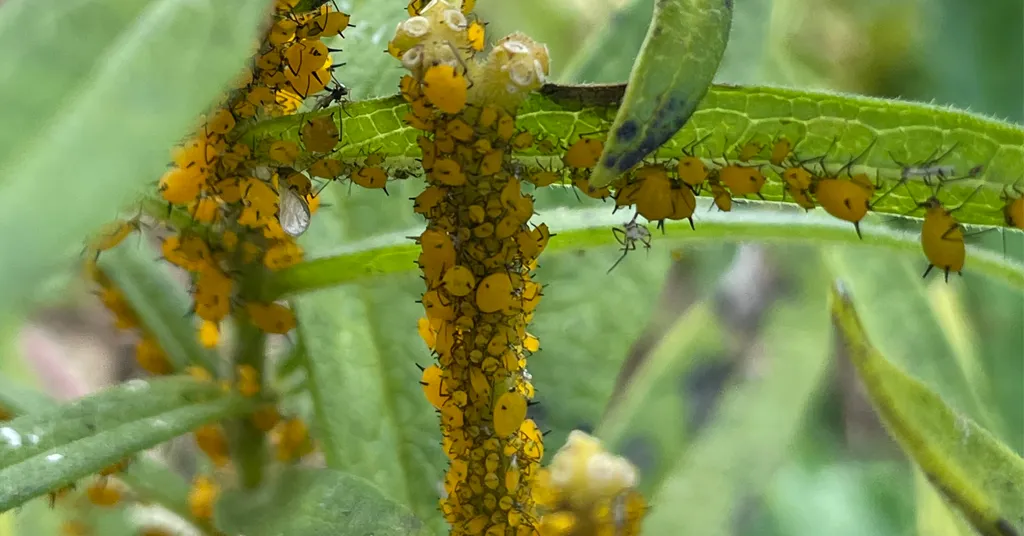
Aphids are one of the most common garden pests, and chances are, you’ve dealt with them if you’ve spent time caring for plants. These tiny, pear-shaped insects are sap-suckers, feeding on plant juices and causing a host of problems ranging from stunted growth to curled, yellowing leaves. They reproduce quickly and often go unnoticed until their population explodes, wreaking havoc on your garden. Let’s look at how to manage aphids effectively and keep your plants healthy.
Encouraging Beneficial Insects
When it comes to controlling aphids naturally, your best allies are beneficial insects like ladybugs and lacewings. Think of these tiny predators as your garden’s built-in pest control team. Here’s how to attract and support them:
- Plant Nectar-Rich Flowers: Flowers like yarrow, cosmos, and marigolds serve as an irresistible buffet for beneficial insects. By planting these near your garden, you’re rolling out the red carpet for natural aphid predators.
- Provide a Welcoming Habitat: Insects like lacewings thrive in diverse environments. Include ground covers, shrubs, and a mix of native plants to create a safe space for beneficial insects to lay eggs and flourish.
- Avoid Harsh Chemicals: Many pesticides, even organic ones, can harm beneficial insects. Stick to targeted solutions or manual removal methods to preserve your garden’s natural helpers.
Want to know more about managing aphids organically? Head to Aphid Control in Home Gardens for practical tips to protect your plants from these common garden pests.
By encouraging natural predators like ladybugs and lacewings, you can maintain a balanced ecosystem in your garden and keep aphid populations under control without resorting to synthetic pesticides.
4. Harlequin Bugs
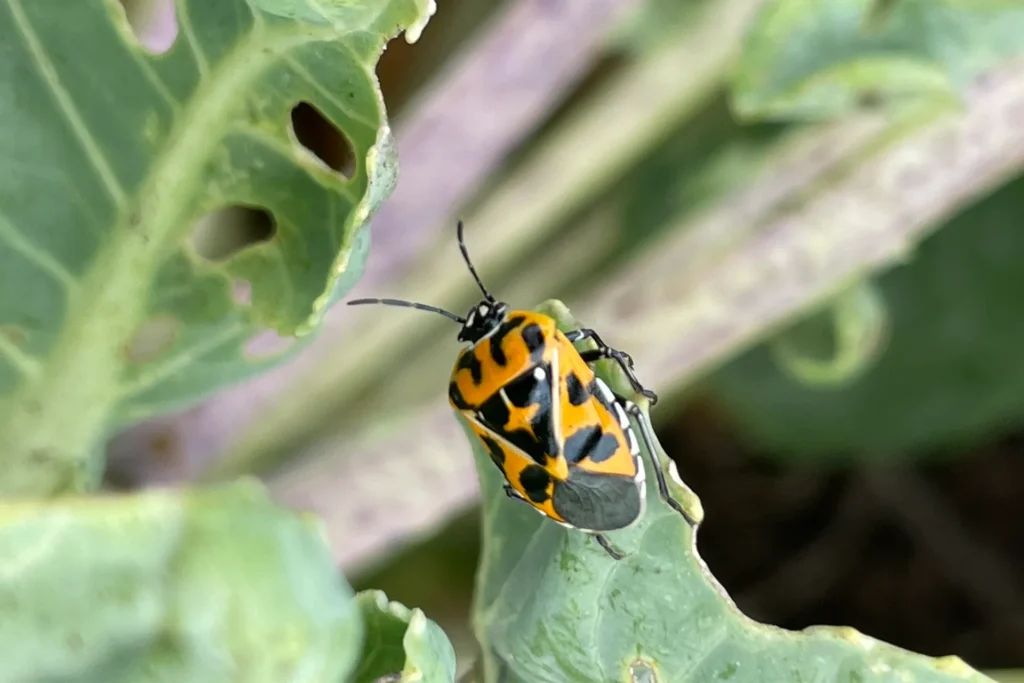
Harlequin Bugs (Murgantia histrionica) are a vibrant, unmistakable pest that can pose a significant threat to your garden, especially if you grow cruciferous crops like cabbage, broccoli, and kale. Their striking red, orange, and black shield-shaped bodies might look attractive, but their feeding habits can spell disaster for plants. Let’s explore who they are, the damage they cause, and how to manage these notorious garden pests.
What Do Harlequin Bugs Look Like?
One of the easiest ways to spot a Harlequin Bug is by its colorful patterned body, which is black with red, orange, and sometimes yellow markings. Adults are shield-shaped, measuring about 1/4 to 3/8 inches long. The bugs lay their barrel-shaped eggs in clusters, often on the undersides of leaves. Nymphs are wingless versions of the adults, with similar bright coloring.
If you’re walking through your garden and spot clusters of these brightly colored pests, it’s a clear signal to jump into action.
Damage Caused by Harlequin Bugs
Harlequin Bugs are sap-suckers. They use their needle-like mouthparts to puncture plant tissues and extract nutrients, leading to visible damage such as:
- Yellowing and Wilting: Leaves may turn yellow or brown due to loss of sap, often resulting in an unhealthy-looking plant.
- Deformed Growth: Feeding can cause stunted growth in young plants or leave scars on mature vegetables.
- Crop Loss: In severe infestations, plants in the Brassicaceae family (like kale, cabbage, and mustard greens) can perish altogether.
Not only do Harlequin Bugs weaken plants directly, but their feeding sites can also serve as entry points for fungal and bacterial diseases.
How to Prevent Harlequin Bug Infestations
Preventing an infestation is far easier than dealing with a full-blown problem. Here are some effective garden hygiene and prevention techniques:
- Remove Crop Residues: Harlequin Bugs overwinter in crop debris. Clearing your garden at the end of each growing season reduces their breeding grounds.
- Weed Control: These pests can also thrive on weeds like mustard and wild radish. Keep weeds in check to eliminate their food sources.
- Companion Planting: Certain plants can repel or distract Harlequin Bugs. You can learn more about using companion plants creatively in your garden by visiting Companion Planting.
- Floating Row Covers: Prevent females from laying eggs on your brassica crops by using physical barriers like row covers. Seal them tightly for maximum protection.
- Trap Cropping: Planting preferred hosts like mustard elsewhere in the garden can help divert Harlequin Bugs away from your main crops, concentrating the pests in one location for easier removal.
Harnessing Natural and Organic Control Methods
If Harlequin Bugs have already set up shop in your garden, don’t panic. You can manage their populations with these eco-friendly methods:
- Hand-Picking: As unappealing as it may sound, removing bugs manually is effective for small-scale infestations. Drop them into soapy water to dispatch them quickly.
- Introduce Beneficial Insects: Natural predators like parasitic wasps can target Harlequin Bug eggs, keeping their numbers down.
- Spray Organic Solutions: Neem oil, insecticidal soap, or a mixture of garlic and water can deter Harlequin Bugs while being safe for plants and humans.
- Regular Monitoring: Early detection is everything. Check the undersides of leaves for eggs, nymphs, and adults, especially during the warm growing season.
For more detailed strategies on preventing these pests from taking over, check out Stop Harlequin Bugs: 5 Essential Prevention Tips for Your Garden.
By staying proactive with prevention and using a mix of natural and cultural controls, you can successfully protect your garden from Harlequin Bugs and keep your crops thriving. These pests may be persistent, but with the right tools and strategies, they don’t stand a chance!
5. Flea Beetles
Flea beetles may be tiny, but their damage can leave a big mark on your garden. These small jumping pests are commonly found in vegetable gardens during the warmer months, especially on young plants like radishes, eggplants, and leafy greens. If you’ve noticed small, irregular holes appearing on your plant leaves seemingly overnight, you’re likely dealing with flea beetles. Here’s how they can affect your garden and what you can do to control them.
Damage Caused by Flea Beetles
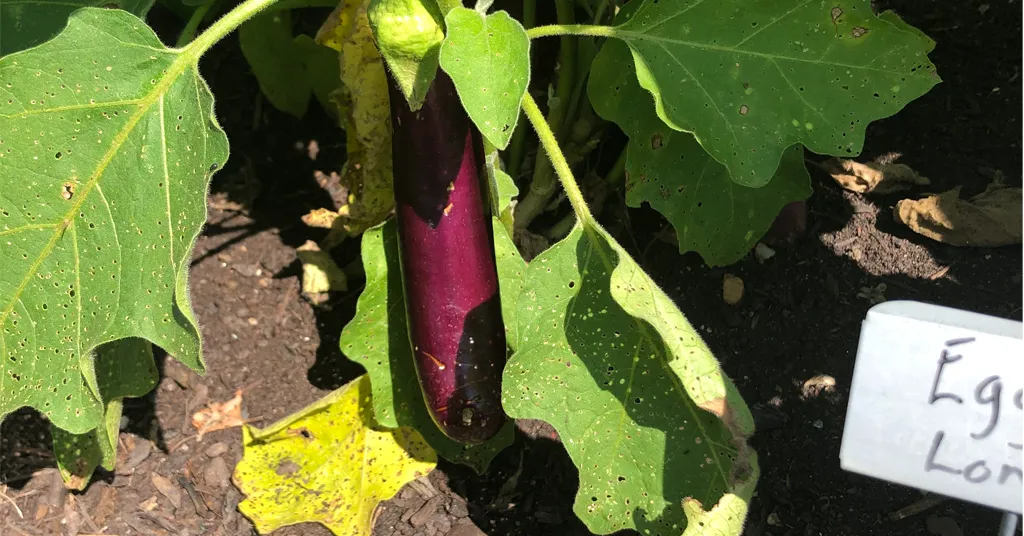
Flea beetles are known for their ability to cause distinctive damage called “shot-hole” feeding. They chew small, round holes in leaves, leaving plants looking perforated like a piece of Swiss cheese. This kind of damage might seem cosmetic, but if left unchecked, it can weaken plants, slow growth, and ruin harvests. Young seedlings and leafy greens are particularly at risk—severe infestations can even kill fragile plants before they have a chance to mature.
These pests also pose an added threat by spreading diseases like bacterial wilt and blight from plant to plant, further compounding the problems they cause in your garden.
How to Identify Flea Beetles
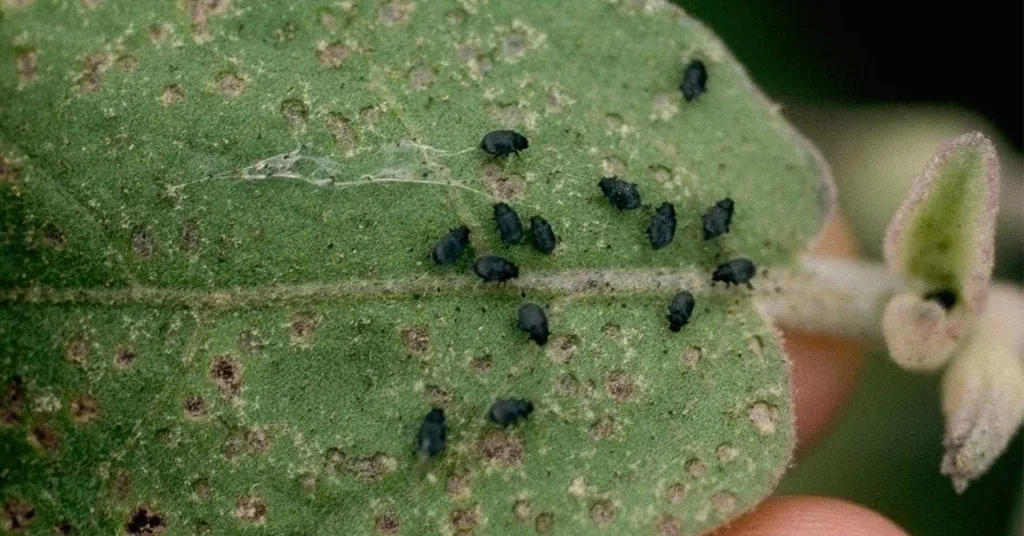
Flea beetles are tiny, fast-moving insects that resemble specks of dust hopping around your plants. These pests are about 1/16 to 1/8 of an inch long with shiny black or brown bodies. Some species may have stripes or metallic coloring, making them deceptively flashy for such destructive pests. If you see small holes in your leaves combined with fast-moving, jumping insects when disturbed, it’s a good indicator you’re dealing with flea beetles.
Best Strategies for Preventing Flea Beetles
Keeping flea beetles out of your garden requires a proactive approach. Luckily, there are several effective ways to protect your plants:
- Row Covers: Lightweight fabric row covers act as physical barriers, preventing flea beetles from reaching your plants. Be sure to secure the covers tightly around the edges to keep pests out. This method works exceptionally well for crops like radishes and greens.
- Trap Cropping: Consider planting a sacrificial trap crop such as mustard greens or bok choy near your main vegetable plants. These pest-attracting crops lure flea beetles away from your valued produce, concentrating the damage on plants you’re willing to sacrifice.
- Practice Crop Rotation: Flea beetles overwinter in the soil near their favorite hosts. Rotating crops each season can help disrupt their lifecycle and reduce their population.
- Maintain Healthy Soil: A strong, vibrant plant is naturally more resistant to pest damage. Keep your soil enriched with organic matter and compost to promote plant vigor.
Natural and Organic Control Methods
If you’re already seeing signs of flea beetle damage, it’s important to take action before the infestation worsens. Here are some effective and eco-friendly solutions:
- Neem Oil or Insecticidal Soaps: These organic sprays help deter flea beetles without harming your plants or beneficial insects. Apply to affected leaves early in the morning or just before dusk when beetles are most active.
- Plant Companion Crops: Cultivate herbs and flowers like basil, dill, or marigolds near vulnerable plants to repel flea beetles. Companion planting not only deters these pests but can also enhance your garden’s overall biodiversity.
- Diatomaceous Earth: This powder, made from crushed fossilized algae, can be sprinkled around plants as a barrier. It dehydrates and kills flea beetles on contact while remaining safe for humans and pets.
- Encourage Natural Predators: Beneficial insects like ladybugs and lacewings actively feast on flea beetles. Provide shelter and nectar-rich flowers to attract these allies to your garden.
With consistent monitoring and the right preventative measures, flea beetles can be managed effectively without compromising your garden’s health. These tiny pests may be aggressive jumpers, but with the right tools and strategies, you can protect your plants and enjoy a thriving harvest.
6. Japanese Beetle
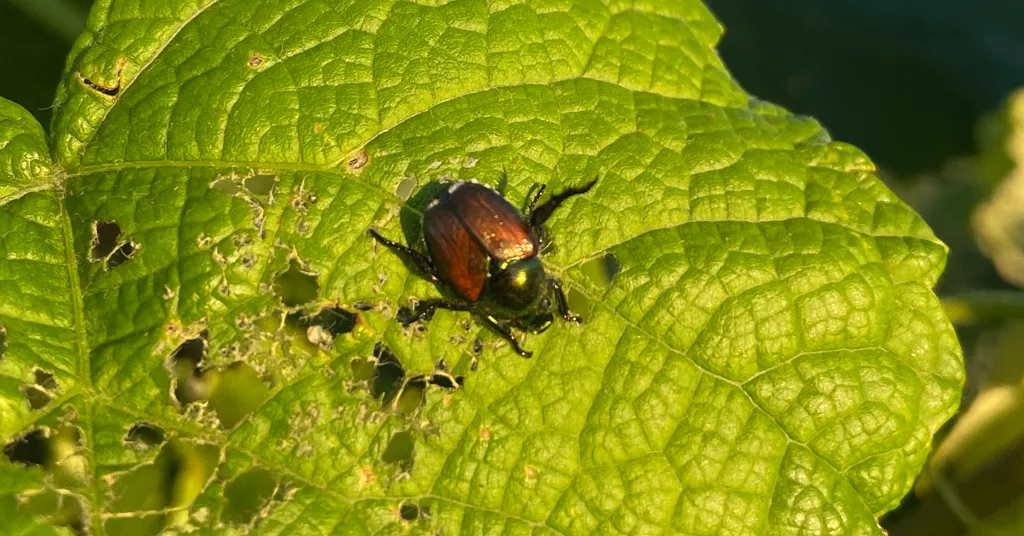
Japanese Beetles are a notorious garden pest with a reputation for causing widespread destruction in a short amount of time. Their striking metallic-green bodies make them easy to identify, but don’t be fooled by their appearance—these beetles can quickly turn your once-thriving plants into a buffet. If you’re growing vegetables, ornamentals, or fruit trees, understanding these pests is essential for minimizing their impact.
What Damage Do Japanese Beetles Cause?
Japanese Beetles are ravenous feeders that attack over 300 types of plants. They’re particularly fond of roses, beans, grapes, and fruit trees. Adult beetles skeletonize leaves by eating the tissue between the veins, leaving behind a lacy appearance. They also feed on flowers and fruits, ruining their appearance and reducing yields.
What’s worse is that their larvae (grubs) damage lawns by feeding on grassroots, causing grass patches to wither and die. If you’re noticing brown patches in your lawn, it might be a sign of an underground grub problem.
Life Cycle of the Japanese Beetle
To effectively control Japanese Beetles, it helps to understand their lifecycle:
- Egg Stage: Female beetles lay eggs in soil, especially in lush lawns or garden beds, during the summer.
- Larvae (Grub) Stage: These grubs hatch and begin feeding on grassroots, remaining in the soil throughout fall and winter.
- Pupa Stage: In the spring, the grubs pupate near the soil surface and eventually emerge as adult beetles.
- Adult Stage: Adults appear in the early summer, feeding on plants and causing damage before beginning the reproductive cycle again.
This ongoing cycle can lead to significant issues if left unchecked, so it’s essential to address the problem at every stage.
How to Control Japanese Beetles
Managing Japanese Beetles requires a multi-faceted approach to target both the adults and their larvae. Here are some effective strategies:
- Hand-Picking: In the early morning or late evening, when beetles are less active, shake them off plants into a bucket of soapy water. It’s simple yet effective, especially for small infestations.
- Use Row Covers: Protect plants with lightweight row covers during peak activity periods to prevent beetles from feeding or laying eggs.
- Introduce Beneficial Nematodes: To combat grub populations, apply nematodes like Heterorhabditis bacteriophora to your soil. These natural predators target and kill Japanese Beetle larvae underground.
- Attract Natural Predators: Birds, tachinid flies, and parasitic wasps are natural enemies of Japanese Beetles. Planting flowers like dill or fennel can encourage these beneficial insects to take up residence in your garden.
- Milky Spore: This biological control kills beetle larvae in the soil and can provide long-term control by reducing future adult populations. However, it takes time to see results, as it only targets grubs.
- Companion Planting: Certain plants, like garlic and tansy, can help deter beetles. Incorporating these into your garden may reduce their attraction to more vulnerable crops.
By taking a proactive approach with these methods, you can significantly reduce the impact of Japanese Beetles on your garden. Regular monitoring and addressing infestations early are vital to keeping your plants healthy and thriving.
7. Colorado Potato Beetle
When it comes to garden pests, the Colorado Potato Beetle stands out as one of the most notorious, especially for those growing potato plants. These pests are not only prolific but also highly destructive, threatening your crop’s health and your harvest. Managing them effectively requires vigilance and a mix of strategies. Let’s look at what makes these beetles such a challenge and how to keep them in check.
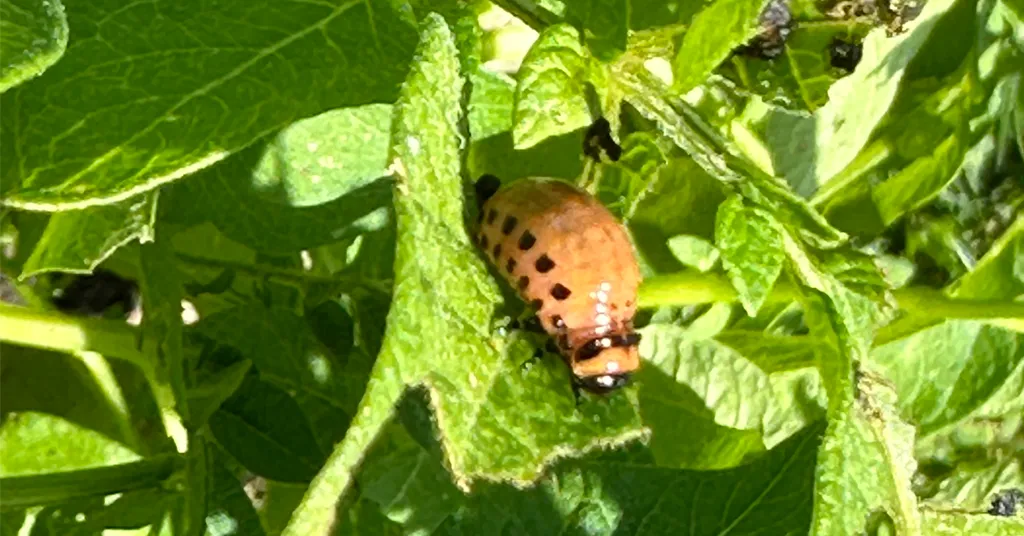
What Damage Do Colorado Potato Beetles Cause?
The Colorado Potato Beetle primarily targets plants in the nightshade family, with a special fondness for potatoes, eggplants, and tomatoes. Both adult beetles and their larvae wreak havoc by devouring leaves, often skeletonizing plants entirely. This feeding damage disrupts photosynthesis, weakening the plant and reducing tuber yield.
The larvae are particularly aggressive feeders. Picture this: one day, you have lush, green potato plants, and seemingly overnight, they’re reduced to tattered stems. Heavy infestations can devastate an entire crop if left unmanaged.
How to Identify Colorado Potato Beetles
To tackle these pests head-on, you’ll need to know how to spot them quickly:
- Adults: These beetles are about 3/8 inch long with a distinctive yellow-and-black striped pattern on their wing covers.
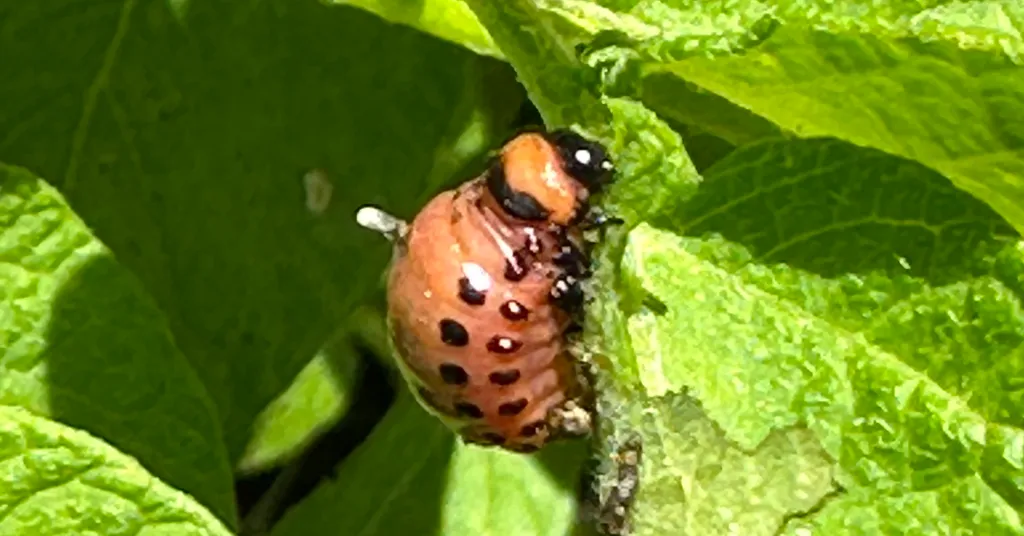
- Larvae: They’re reddish-orange with a row of black spots along their sides, growing rapidly as they feed.
- Eggs: The beetles lay small, bright orange eggs in clusters on the undersides of leaves. Keeping an eye on your plants can help you catch them before they hatch.
If you spot any of these signs, it’s time to act before the infestation gets out of hand.
Using Crop Rotation to Manage Infestations
One of the best preventative strategies against Colorado Potato Beetles is crop rotation. Because these pests overwinter in the soil near where they fed last season, rotating your crops can interrupt their lifecycle and reduce their numbers.
- Avoid planting potatoes (or other nightshade crops) in the same spot consecutively. This disrupts the beetles’ habitat.
- Incorporate non-host crops such as legumes or leafy greens in the rotation. This practice not only minimizes pest pressure but also keeps your soil healthy.
Organic Control with Diatomaceous Earth
Diatomaceous earth is a natural and highly effective tool for combatting Colorado Potato Beetles. This fine powder, made from fossilized algae, works by dehydrating and ultimately killing pests when they come into contact with it.
- How to Use It: Sprinkle a thin layer around the base of plants and on leaves where beetles or larvae are active. Focus on areas where you’ve noticed eggs as well—it can reduce the population significantly.
- Timing: Apply after watering or rain to ensure it sticks to the plants but reapply as needed, since moisture reduces its effectiveness.
Other Natural Tactics to Combat Colorado Potato Beetles
Aside from crop rotation and diatomaceous earth, there are several other methods to keep these pests under control organically:
- Hand-Picking: It’s as simple as it sounds—remove beetles, larvae, and egg clusters by hand and dispose of them in soapy water.
- Mulching: Straw mulch around plants can deter beetles from reaching your crops.
- Beneficial Insects: Encourage natural predators like ladybugs and lacewing larvae, which can keep beetle populations in check.
By staying proactive and combining these strategies, you can protect your potato plants from Colorado Potato Beetles without resorting to harsh chemicals. A balanced approach makes a big difference in preserving your garden’s health.
8. Squash Bugs
Squash bugs (Anasa tristis) are the bane of many gardeners, especially when growing squashes, pumpkins, and other cucurbit crops. These pests are resilient, sneaky, and can quickly take down even the healthiest of plants. If you’ve found wilting vines or spotted dark spots on your squash leaves, it’s time to investigate for squash bugs.
One thing’s for sure—they’re not going to go away on their own. Understanding how they operate and taking swift action can make all the difference in saving your harvest.
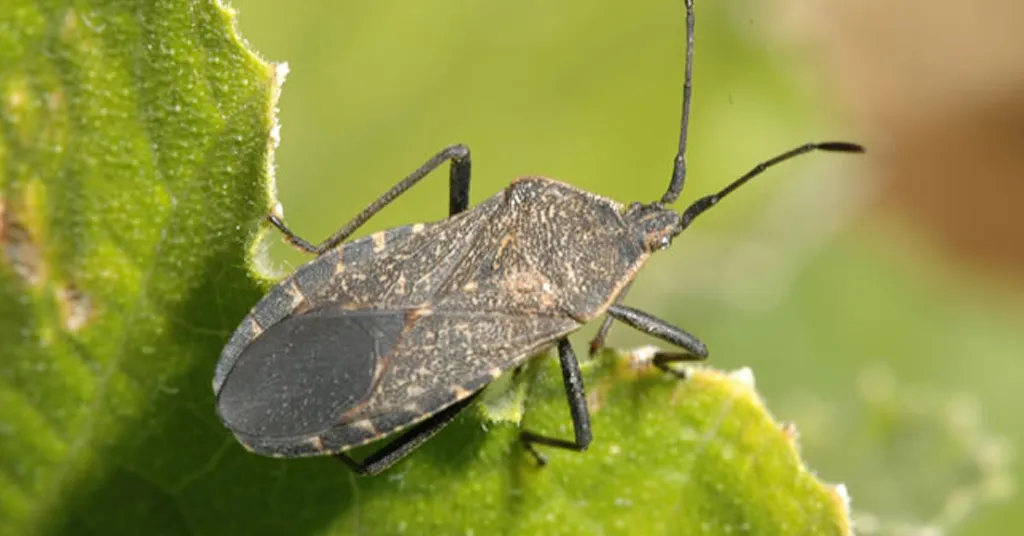
Recognizing Squash Bug Damage
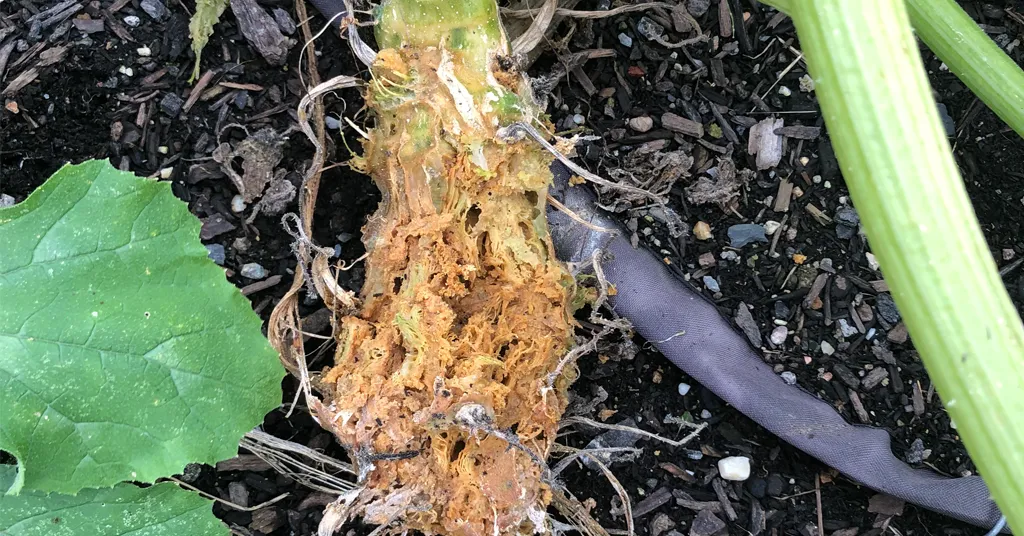
The damage from squash bugs isn’t subtle. These pests suck nutrients directly from plant leaves and stems, which can wreak havoc on the plant’s ability to thrive. Here’s what you’re likely to see when they invade:
- Wilting Plants: If you start noticing what looks like drought stress, even when you’re watering regularly, squash bugs could be the culprit.
- Brown Spots on Leaves: Their feeding leaves behind discolored, yellowish to brown spots that can spread across the leaves.
- Stunted Growth: Prolonged infestations can cause plants to stop growing altogether, ruining your potential harvest.
The damage isn’t just physical. Squash bugs can also spread bacterial wilt, which clogs the plant’s vascular system and ultimately kills it.
How to Detect Squash Bugs
Finding squash bugs early is key to getting ahead of the problem. They love to hide, so you’ll often have to get up close and personal with your plants. Here’s how to spot them:
- Check for Eggs: Look on the undersides of leaves. Their eggs are small, shiny, and copper-colored, typically laid in clusters.
- Look for Nymphs: Young squash bugs, or nymphs, are light gray with black legs. They’re often seen in large groups and move quickly.
- Find Adults: Adults are shield-shaped, about 5/8 inch long, and dark brown with orangish edges. If you spot one, chances are, there are more nearby.
Organic Solutions to Control Squash Bugs
Luckily, you can fight back against squash bugs without resorting to harsh chemicals. Here are some organic and effective strategies you can use:
- Manual Removal: Squash bugs are tough, but they aren’t fast. Inspect your plants regularly, especially the undersides of leaves, and remove any bugs or eggs by hand. Drop them into a bucket filled with soapy water to dispose of them.
- Apply Neem Oil: This natural insecticide disrupts the squash bug lifecycle. Spray neem oil directly onto affected leaves and stems, concentrating on areas where eggs or nymphs are present.
- Introduce Companion Plants: Certain herbs like nasturtiums and marigolds can repel squash bugs. Plant these near your squash and pumpkins for a natural deterrent.
- Use Floating Row Covers: Prevent bugs from infestations by covering your crops early in the season. Ensure the covers are sealed at the edges to block all access.
- Attract Beneficial Insects: Encourage predators like ground beetles or tachinid flies, which naturally prey on squash bugs. Planting flowers like dill or fennel can help attract these helpful insects.
- Clean Up Your Garden: Squash bugs overwinter in garden debris, so cleaning out old vines and leaf litter at the end of the season can drastically cut down on their numbers next year.
By staying vigilant and using these methods consistently, you can keep squash bugs at bay and protect your garden from their destructive tendencies. Don’t let these pests rob you of your hard-earned produce!
9. Cucumber Beetle
Cucumber Beetles are a common nightmare for anyone growing cucumbers, squash, or other cucurbits. These pests may be small, but their impact is enormous—they eat, nest, and even spread diseases that can devastate your garden in no time. If you’ve ever been puzzled by stunted plants or yellowing leaves, these beetles could be the culprit. Let’s look into their habits, the damage they cause, and strategies to keep them under control.
How to Identify Cucumber Beetles
Recognizing Cucumber Beetles early is key to managing them before they create lasting damage. These pests come in two main types, but they’re all about one thing—destroying your plants.
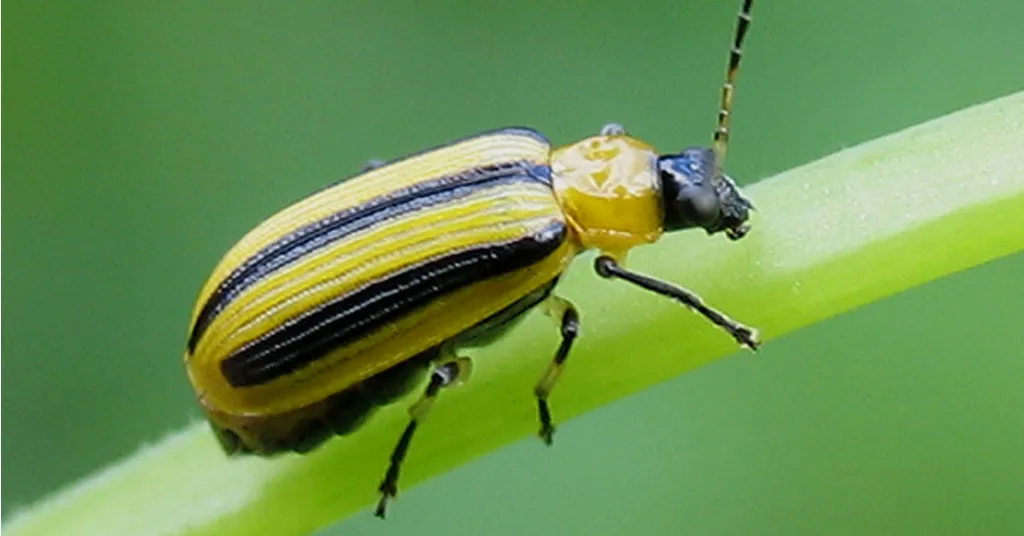
- Striped Cucumber Beetles: These are yellow beetles with black stripes running down their back. They’re easy to confuse with other insects, but their striped pattern is a giveaway.
- Spotted Cucumber Beetles: Bright yellow like their striped cousins, these beetles have 12 black spots on their back.
- Size and Behavior: Both types are small, about 1/4 inch long, and love to hide under leaves or inside blooms. They’re active feeders, especially in the early growing season when your plants are young and most vulnerable.
The beetles are not just leaf-eaters—pay attention to the flowers and stems. They can also attack blossoms, which interrupt pollination and lead to fewer fruits.
Damage Caused by Cucumber Beetles
What makes these pests so problematic? Their damage hits in several ways, impacting both the plants and the surrounding garden environment.
- Direct Feeding Damage: They chew jagged holes in the leaves, leaving a lace-like appearance. You might also find damaged flowers, reducing your crop yield significantly.
- Transmitting Diseases: Cucumber Beetles carry bacterial wilt, a devastating plant disease. Once transmitted, plants begin to wilt and die no matter how much you water them.
- Attacking the Roots and Stems: The larvae also cause damage by feeding on the roots, stunting plant growth, and weakening the structure.
If you’re noticing plants that suddenly droop or vines that look unhealthy despite your best efforts, it’s time to inspect for cucumber beetles.
Prevention is Better Than Cure
When dealing with Cucumber Beetles, prevention strategies are worth their weight in gold. Here’s how to keep them at bay:
- Grow Disease-Resistant Varieties: Some cucumber and squash varieties have built-in resistance to bacterial wilt, reducing the risk of significant damage. Opting for these types can save a lot of heartache.
- Use Sticky Traps: Bright yellow sticky traps can be highly effective for catching adult beetles before they lay eggs. Set them up around your garden as a first line of defense.
- Cover Your Plants: Floating row covers act as barriers, keeping beetles from reaching plants during their most vulnerable stages. Be sure to remove covers when flowers appear to allow pollination.
- Rotate Crops: Since beetles overwinter in soil, planting cucumbers and squashes in a new location each year interrupts their lifecycle.
Natural Control Methods
If beetles have already set up camp in your garden, don’t worry—you can still fight back with natural control methods:
- Hand-Pick Beetles: Yes, it’s tedious, but it’s effective. Check plants early in the morning when beetles are sluggish and pluck them off.
- Introduce Beneficial Insects: Natural predators like soldier beetles and tachinid flies can help control populations. Attract these helpers by planting dill, fennel, or daisy-like flowers.
- Neem Oil Spray: Organic sprays made from neem oil disrupt the beetle’s lifecycle without harming beneficial insects or the environment.
- Diatomaceous Earth: Sprinkle this natural substance around the base of plants to dry out and kill beetles at their feeding areas.
Staying consistent with these methods will go a long way in reducing damage without resorting to harsh chemicals.
In addition, vertical growing can help improve airflow and make it harder for beetles to access plants. For more on vertical gardening benefits, check out Build a DIY Cattle Panel Trellis Arch for practical solutions that help with pests too.
By staying proactive and using a mix of prevention and control strategies, you can protect your cucumbers and other cucurbits from these relentless pests.
10. Slugs and Snails
Slugs and snails are some of the most frustrating garden pests, especially for those of us who grow delicate, leafy plants. With their slow and slimy movements, they might seem harmless at first glance, but the destruction they cause under the cover of darkness can leave you pulling your hair in frustration. They thrive in damp environments, feeding at night and hiding during the day, making them tricky to spot. Let me share what you need to know about dealing with these silent invaders.
Damage Caused by Slugs and Snails
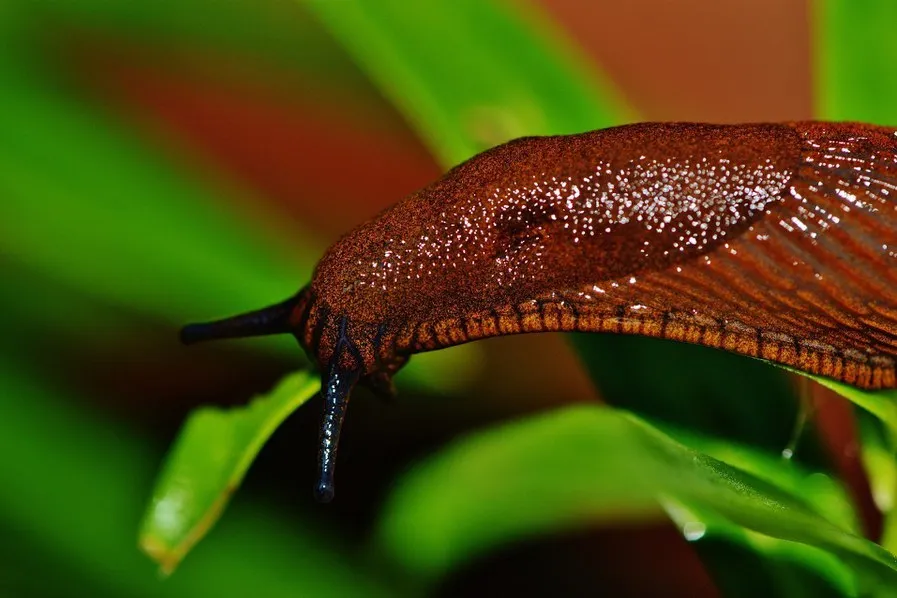
Slugs and snails primarily feed on tender plants, leaving behind ragged holes in leaves, stems, and occasionally fruits. They’re particularly notorious for destroying seedlings, which are often too young to recover from their munching spree. Additionally, they leave slimy trails wherever they go—these trails can act as a giveaway if you suspect but don’t immediately see them in action.
If your garden features lettuce, hostas, or any leafy greens, you’ll want to be especially vigilant. Aside from the obvious visual damage, unchecked infestations can stunt plant growth or even kill young plants entirely.
Identifying the Culprits
One of the biggest challenges with slugs and snails is their nocturnal nature. While they hide during daytime under mulch, pots, or dense foliage, they come out at night to feast.
- Look for Slime Trails: If you see shimmering silver trails on leaves, pots, or soil, you likely have slugs and snails at work.
- Check Damaged Areas Early in the Morning: Look closely at vulnerable plants before the sun is up. You may find them still clinging to leaves or stems.
If you’re dealing with slimy trails around leafy greens, it wouldn’t hurt to explore how slugs impact crops like lettuce. You might find helpful tips in How to Grow Lettuce, where pest prevention gets a mention.
Tips for Controlling Slugs and Snails
The good news is that there are both natural and practical ways to manage slugs and snails without turning your garden into a chemical war zone. Here are some tried-and-true strategies:
- Set Up Beer Traps:
- Slugs are attracted to the yeast in beer. Place shallow dishes with beer around your plants, ensuring the edges are level with the soil to easily lure them in. Once they’re in, they won’t get out.
- Install Copper Barriers:
- Copper is an excellent slug deterrent. Wrap strips of copper tape around your pots, garden beds, and even plant stems. When slugs touch the copper, it creates a reaction they find unpleasant, effectively keeping them at bay.
- Use Organic Baits:
- Slug baits made from iron phosphate are safe for your garden and pets while being highly effective. Scatter them around areas where you’ve seen damage for targeted results.
- Clean Up Hiding Spots:
- Reduce potential daytime hiding places. Remove garden debris, weeds, and anything that creates shade or moisture. Without suitable shelter, slugs and snails will have fewer places to lurk.
- Encourage Predators:
- Certain animals like birds, frogs, and even some beetles feed on slugs and snails. Attracting these natural predators to your garden can help keep the slimy population in check.
- Water Wisely:
- Since slugs and snails thrive in damp environments, water your garden early in the morning rather than in the evening. This gives the soil time to dry out by night, making it less inviting to these pests.
By taking a mix of preventive and direct measures, you can protect your plants from slugs and snails without constantly battling their damage. After all, the goal is to enjoy a thriving garden—and slimy pests don’t have to stand in the way.
Dealing with common garden pests doesn’t have to feel overwhelming. Early detection and regular maintenance make all the difference in keeping your garden thriving. By understanding the habits of pests and using natural methods like companion planting, you can protect your plants and promote a balanced ecosystem.
If you’re looking to prevent pests naturally, explore Companion Planting for tips on growing pest-repellent plants alongside your crops. Taking action now ensures a healthier garden and a more rewarding harvest.
What strategies have worked best in your garden? Let me know in the comments or explore other resources to keep learning. The more you know about pests and their behavior, the better equipped you’ll be to enjoy a flourishing garden year-round.
